> ## Documentation Index
> Fetch the complete documentation index at: https://langchain-5e9cc07a-preview-eugene-1763577327-bfe51c2.mintlify.site/llms.txt
> Use this file to discover all available pages before exploring further.
# How to run evaluations with Vitest/Jest (beta)
LangSmith provides integrations with Vitest and Jest that allow JavaScript and TypeScript developers define their datasets and evaluate using familiar syntax.
 Compared to the `evaluate()` evaluation flow, this is useful when:
* Each example requires different evaluation logic
* You want to assert binary expectations, and both track these assertions in LangSmith and raise assertion errors locally (e.g. in CI pipelines)
* You want to take advantage of mocks, watch mode, local results, or other features of the Vitest/Jest ecosystems
Requires JS/TS SDK version `langsmith>=0.3.1`.
The Vitest/Jest integrations are in beta and are subject to change in upcoming releases.
The Python SDK has an analogous [pytest integration](/langsmith/pytest).
## Setup
Set up the integrations as follows. Note that while you can add LangSmith evals alongside your other unit tests (as standard `*.test.ts` files) using your existing test config files, the below examples will also set up a separate test config file and command to run your evals. It will assume you end your test files with `.eval.ts`.
This ensures that the custom test reporter and other LangSmith touchpoints do not modify your existing test outputs.
### Vitest
Install the required development dependencies if you have not already:
```bash yarn theme={null}
yarn add -D vitest dotenv
```
```bash npm theme={null}
npm install -D vitest dotenv
```
```bash pnpm theme={null}
pnpm add -D vitest dotenv
```
The examples below also require `openai` (and of course `langsmith`!) as a dependency:
```bash yarn theme={null}
yarn add langsmith openai
```
```bash npm theme={null}
npm install langsmith openai
```
```bash pnpm theme={null}
pnpm add langsmith openai
```
Then create a separate `ls.vitest.config.ts` file with the following base config:
```typescript theme={null}
import { defineConfig } from "vitest/config";
export default defineConfig({
test: {
include: ["**/*.eval.?(c|m)[jt]s"],
reporters: ["langsmith/vitest/reporter"],
setupFiles: ["dotenv/config"],
},
});
```
* `include` ensures that only files ending with some variation of `eval.ts` in your project are run
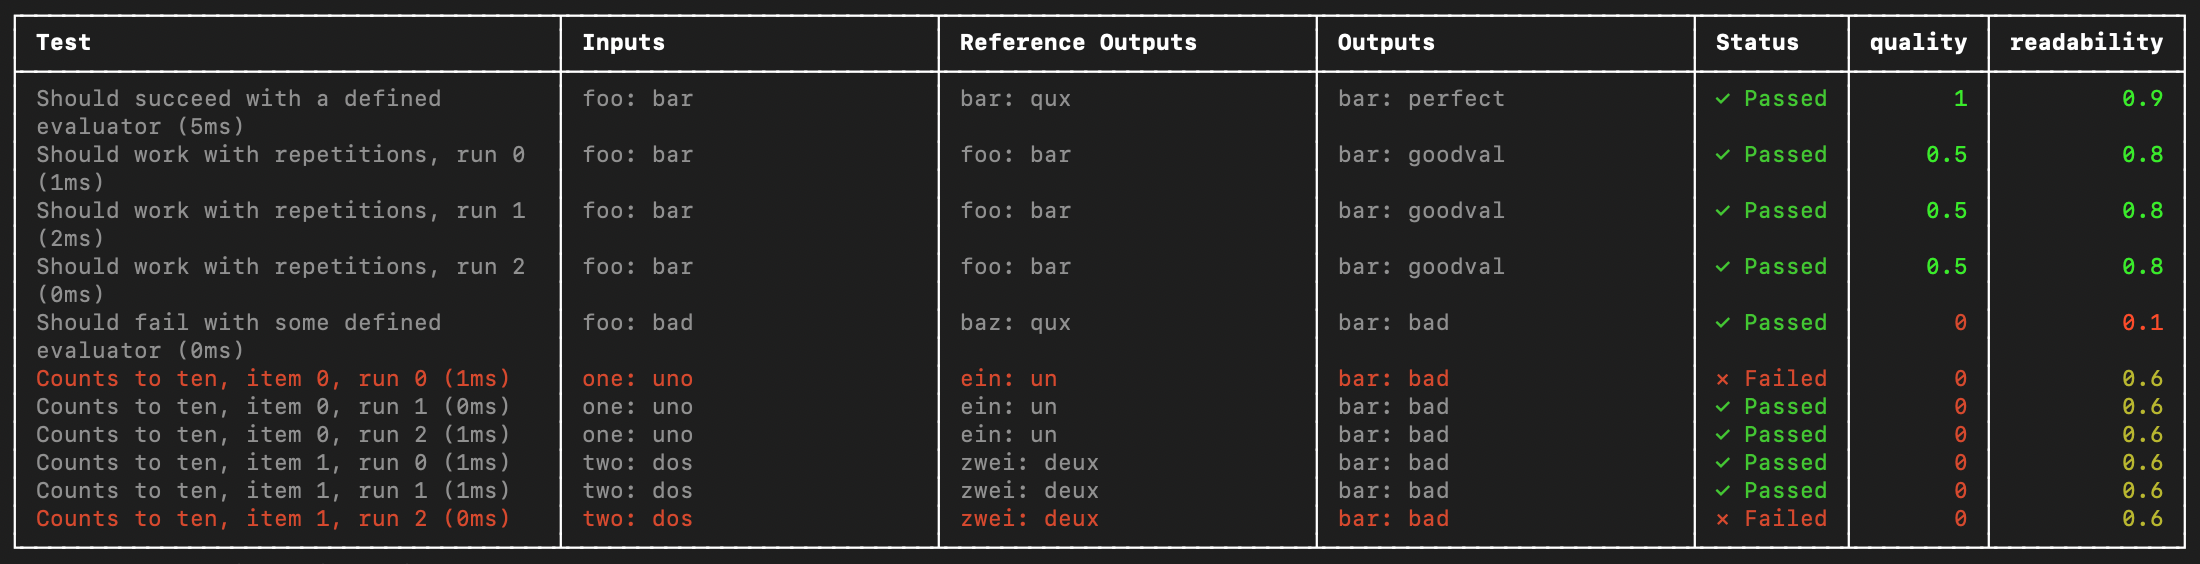
* `reporters` is responsible for nicely formatting your output as shown above
* `setupFiles` runs `dotenv` to load environment variables before running your evals
JSDom environments are not supported at this time. You should either omit the `"environment"` field from your config or set it to `"node"`.
Finally, add the following to the `scripts` field in your `package.json` to run Vitest with the config you just created:
```json theme={null}
{
"name": "YOUR_PROJECT_NAME",
"scripts": {
"eval": "vitest run --config ls.vitest.config.ts"
},
"dependencies": {
...
},
"devDependencies": {
...
}
}
```
Note that the above script disables Vitest's default watch mode for running evals since many evaluators may include longer running LLM calls.
### Jest
Install the required development dependencies if you have not already:
```bash yarn theme={null}
yarn add -D jest dotenv
```
```bash npm theme={null}
npm install -D jest dotenv
```
```bash pnpm theme={null}
pnpm add -D jest dotenv
```
The examples below also require `openai` (and of course `langsmith`!) as a dependency:
```bash yarn theme={null}
yarn add langsmith openai
```
```bash npm theme={null}
npm install langsmith openai
```
```bash pnpm theme={null}
pnpm add langsmith openai
```
The setup instructions below are for basic JS files and CJS. To add support for TypeScript and ESM, see Jest's official docs or use [Vitest](#vitest).
Then create a separate config file named `ls.jest.config.cjs`:
```javascript theme={null}
module.exports = {
testMatch: ["**/*.eval.?(c|m)[jt]s"],
reporters: ["langsmith/jest/reporter"],
setupFiles: ["dotenv/config"],
};
```
* `testMatch` ensures that only files ending with some variation of `eval.js` in your project are run
* `reporters` is responsible for nicely formatting your output as shown above
* `setupFiles` runs `dotenv` to load environment variables before running your evals
JSDom environments are not supported at this time. You should either omit the `"testEnvironment"` field from your config or set it to `"node"`.
Finally, add the following to the `scripts` field in your `package.json` to run Jest with the config you just created:
```json theme={null}
{
"name": "YOUR_PROJECT_NAME",
"scripts": {
"eval": "jest --config ls.jest.config.cjs"
},
"dependencies": {
...
},
"devDependencies": {
...
}
}
```
## Define and run evals
You can now define evals as tests using familiar Vitest/Jest syntax, with a few caveats:
* You should import `describe` and `test` from the `langsmith/jest` or `langsmith/vitest` entrypoint
* You must wrap your test cases in a `describe` block
* When declaring tests, the signature is slightly different - there is an extra argument containing example inputs and expected outputs
Try it out by creating a file named `sql.eval.ts` (or `sql.eval.js` if you are using Jest without TypeScript) and pasting the below contents into it:
```typescript theme={null}
import * as ls from "langsmith/vitest";
import { expect } from "vitest";
// import * as ls from "langsmith/jest";
// import { expect } from "@jest/globals";
import OpenAI from "openai";
import { traceable } from "langsmith/traceable";
import { wrapOpenAI } from "langsmith/wrappers/openai";
// Add "openai" as a dependency and set OPENAI_API_KEY as an environment variable
const tracedClient = wrapOpenAI(new OpenAI());
const generateSql = traceable(
async (userQuery: string) => {
const result = await tracedClient.chat.completions.create({
model: "gpt-4o-mini",
messages: [
{
role: "system",
content:
"Convert the user query to a SQL query. Do not wrap in any markdown tags.",
},
{
role: "user",
content: userQuery,
},
],
});
return result.choices[0].message.content;
},
{ name: "generate_sql" }
);
ls.describe("generate sql demo", () => {
ls.test(
"generates select all",
{
inputs: { userQuery: "Get all users from the customers table" },
referenceOutputs: { sql: "SELECT * FROM customers;" },
},
async ({ inputs, referenceOutputs }) => {
const sql = await generateSql(inputs.userQuery);
ls.logOutputs({ sql }); // <-- Log run outputs, optional
expect(sql).toEqual(referenceOutputs?.sql); // <-- Assertion result logged under 'pass' feedback key
}
);
});
```
You can think of each `ls.test()` case as corresponding to a dataset example, and `ls.describe()` as defining a LangSmith dataset. If you have LangSmith [tracing environment variables](/#3-set-up-your-environment) set when you run the test suite, the SDK does the following:
* creates a [dataset](/langsmith/evaluation-concepts#datasets) with the same name as the name passed to `ls.describe()` in LangSmith if it does not exist
* creates an example in the dataset for each input and expected output passed into a test case if a matching one does not already exist
* creates a new [experiment](/langsmith/evaluation-concepts#experiment) with one result for each test case
* collects the pass/fail rate under the `pass` feedback key for each test case
When you run this test it will have a default `pass` boolean feedback key based on the test case passing / failing. It will also track any outputs that you log with the `ls.logOutputs()` or return from the test function as "actual" result values from your app for the experiment.
Create a `.env` file with your `OPENAI_API_KEY` and LangSmith credentials if you don't already have one:
```bash theme={null}
OPENAI_API_KEY="YOUR_KEY_HERE"
LANGSMITH_API_KEY="YOUR_LANGSMITH_KEY"
LANGSMITH_TRACING="true"
```
Now use the `eval` script we set up in the previous step to run the test:
```bash yarn theme={null}
yarn run eval
```
```bash npm theme={null}
npm run eval
```
```bash pnpm theme={null}
pnpm run eval
```
And your declared test should run!
Once it finishes, if you've set your LangSmith environment variables, you should see a link directing you to an experiment created in LangSmith alongside the test results.
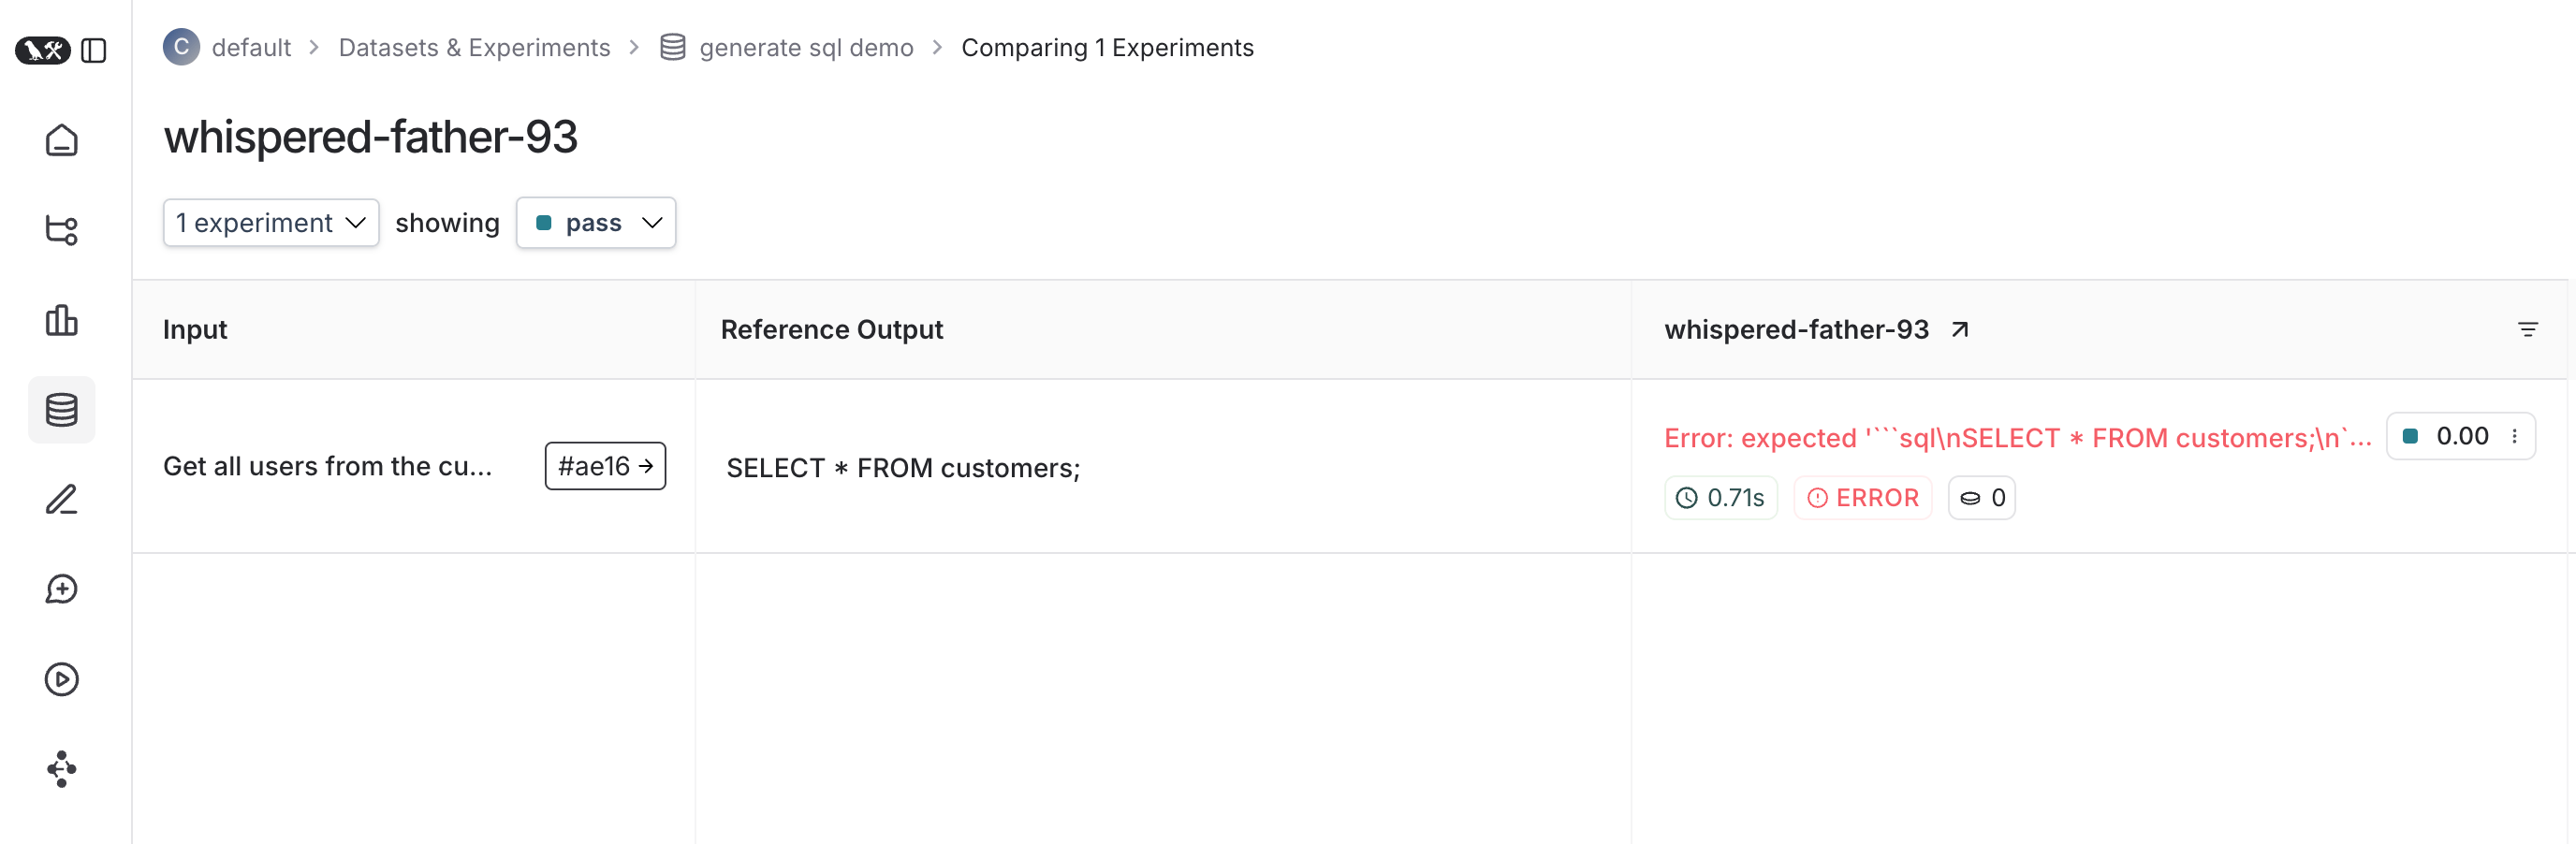
Here's what an experiment against that test suite looks like:
Compared to the `evaluate()` evaluation flow, this is useful when:
* Each example requires different evaluation logic
* You want to assert binary expectations, and both track these assertions in LangSmith and raise assertion errors locally (e.g. in CI pipelines)
* You want to take advantage of mocks, watch mode, local results, or other features of the Vitest/Jest ecosystems
Requires JS/TS SDK version `langsmith>=0.3.1`.
The Vitest/Jest integrations are in beta and are subject to change in upcoming releases.
The Python SDK has an analogous [pytest integration](/langsmith/pytest).
## Setup
Set up the integrations as follows. Note that while you can add LangSmith evals alongside your other unit tests (as standard `*.test.ts` files) using your existing test config files, the below examples will also set up a separate test config file and command to run your evals. It will assume you end your test files with `.eval.ts`.
This ensures that the custom test reporter and other LangSmith touchpoints do not modify your existing test outputs.
### Vitest
Install the required development dependencies if you have not already:
```bash yarn theme={null}
yarn add -D vitest dotenv
```
```bash npm theme={null}
npm install -D vitest dotenv
```
```bash pnpm theme={null}
pnpm add -D vitest dotenv
```
The examples below also require `openai` (and of course `langsmith`!) as a dependency:
```bash yarn theme={null}
yarn add langsmith openai
```
```bash npm theme={null}
npm install langsmith openai
```
```bash pnpm theme={null}
pnpm add langsmith openai
```
Then create a separate `ls.vitest.config.ts` file with the following base config:
```typescript theme={null}
import { defineConfig } from "vitest/config";
export default defineConfig({
test: {
include: ["**/*.eval.?(c|m)[jt]s"],
reporters: ["langsmith/vitest/reporter"],
setupFiles: ["dotenv/config"],
},
});
```
* `include` ensures that only files ending with some variation of `eval.ts` in your project are run
* `reporters` is responsible for nicely formatting your output as shown above
* `setupFiles` runs `dotenv` to load environment variables before running your evals
JSDom environments are not supported at this time. You should either omit the `"environment"` field from your config or set it to `"node"`.
Finally, add the following to the `scripts` field in your `package.json` to run Vitest with the config you just created:
```json theme={null}
{
"name": "YOUR_PROJECT_NAME",
"scripts": {
"eval": "vitest run --config ls.vitest.config.ts"
},
"dependencies": {
...
},
"devDependencies": {
...
}
}
```
Note that the above script disables Vitest's default watch mode for running evals since many evaluators may include longer running LLM calls.
### Jest
Install the required development dependencies if you have not already:
```bash yarn theme={null}
yarn add -D jest dotenv
```
```bash npm theme={null}
npm install -D jest dotenv
```
```bash pnpm theme={null}
pnpm add -D jest dotenv
```
The examples below also require `openai` (and of course `langsmith`!) as a dependency:
```bash yarn theme={null}
yarn add langsmith openai
```
```bash npm theme={null}
npm install langsmith openai
```
```bash pnpm theme={null}
pnpm add langsmith openai
```
The setup instructions below are for basic JS files and CJS. To add support for TypeScript and ESM, see Jest's official docs or use [Vitest](#vitest).
Then create a separate config file named `ls.jest.config.cjs`:
```javascript theme={null}
module.exports = {
testMatch: ["**/*.eval.?(c|m)[jt]s"],
reporters: ["langsmith/jest/reporter"],
setupFiles: ["dotenv/config"],
};
```
* `testMatch` ensures that only files ending with some variation of `eval.js` in your project are run
* `reporters` is responsible for nicely formatting your output as shown above
* `setupFiles` runs `dotenv` to load environment variables before running your evals
JSDom environments are not supported at this time. You should either omit the `"testEnvironment"` field from your config or set it to `"node"`.
Finally, add the following to the `scripts` field in your `package.json` to run Jest with the config you just created:
```json theme={null}
{
"name": "YOUR_PROJECT_NAME",
"scripts": {
"eval": "jest --config ls.jest.config.cjs"
},
"dependencies": {
...
},
"devDependencies": {
...
}
}
```
## Define and run evals
You can now define evals as tests using familiar Vitest/Jest syntax, with a few caveats:
* You should import `describe` and `test` from the `langsmith/jest` or `langsmith/vitest` entrypoint
* You must wrap your test cases in a `describe` block
* When declaring tests, the signature is slightly different - there is an extra argument containing example inputs and expected outputs
Try it out by creating a file named `sql.eval.ts` (or `sql.eval.js` if you are using Jest without TypeScript) and pasting the below contents into it:
```typescript theme={null}
import * as ls from "langsmith/vitest";
import { expect } from "vitest";
// import * as ls from "langsmith/jest";
// import { expect } from "@jest/globals";
import OpenAI from "openai";
import { traceable } from "langsmith/traceable";
import { wrapOpenAI } from "langsmith/wrappers/openai";
// Add "openai" as a dependency and set OPENAI_API_KEY as an environment variable
const tracedClient = wrapOpenAI(new OpenAI());
const generateSql = traceable(
async (userQuery: string) => {
const result = await tracedClient.chat.completions.create({
model: "gpt-4o-mini",
messages: [
{
role: "system",
content:
"Convert the user query to a SQL query. Do not wrap in any markdown tags.",
},
{
role: "user",
content: userQuery,
},
],
});
return result.choices[0].message.content;
},
{ name: "generate_sql" }
);
ls.describe("generate sql demo", () => {
ls.test(
"generates select all",
{
inputs: { userQuery: "Get all users from the customers table" },
referenceOutputs: { sql: "SELECT * FROM customers;" },
},
async ({ inputs, referenceOutputs }) => {
const sql = await generateSql(inputs.userQuery);
ls.logOutputs({ sql }); // <-- Log run outputs, optional
expect(sql).toEqual(referenceOutputs?.sql); // <-- Assertion result logged under 'pass' feedback key
}
);
});
```
You can think of each `ls.test()` case as corresponding to a dataset example, and `ls.describe()` as defining a LangSmith dataset. If you have LangSmith [tracing environment variables](/#3-set-up-your-environment) set when you run the test suite, the SDK does the following:
* creates a [dataset](/langsmith/evaluation-concepts#datasets) with the same name as the name passed to `ls.describe()` in LangSmith if it does not exist
* creates an example in the dataset for each input and expected output passed into a test case if a matching one does not already exist
* creates a new [experiment](/langsmith/evaluation-concepts#experiment) with one result for each test case
* collects the pass/fail rate under the `pass` feedback key for each test case
When you run this test it will have a default `pass` boolean feedback key based on the test case passing / failing. It will also track any outputs that you log with the `ls.logOutputs()` or return from the test function as "actual" result values from your app for the experiment.
Create a `.env` file with your `OPENAI_API_KEY` and LangSmith credentials if you don't already have one:
```bash theme={null}
OPENAI_API_KEY="YOUR_KEY_HERE"
LANGSMITH_API_KEY="YOUR_LANGSMITH_KEY"
LANGSMITH_TRACING="true"
```
Now use the `eval` script we set up in the previous step to run the test:
```bash yarn theme={null}
yarn run eval
```
```bash npm theme={null}
npm run eval
```
```bash pnpm theme={null}
pnpm run eval
```
And your declared test should run!
Once it finishes, if you've set your LangSmith environment variables, you should see a link directing you to an experiment created in LangSmith alongside the test results.
Here's what an experiment against that test suite looks like:
 ## Trace feedback
By default LangSmith collects the pass/fail rate under the `pass` feedback key for each test case. You can add additional feedback with either `ls.logFeedback()` or `wrapEvaluator()`. To do so, try the following as your `sql.eval.ts` file (or `sql.eval.js` if you are using Jest without TypeScript):
```typescript theme={null}
import * as ls from "langsmith/vitest";
// import * as ls from "langsmith/jest";
import OpenAI from "openai";
import { traceable } from "langsmith/traceable";
import { wrapOpenAI } from "langsmith/wrappers/openai";
// Add "openai" as a dependency and set OPENAI_API_KEY as an environment variable
const tracedClient = wrapOpenAI(new OpenAI());
const generateSql = traceable(
async (userQuery: string) => {
const result = await tracedClient.chat.completions.create({
model: "gpt-4o-mini",
messages: [
{
role: "system",
content:
"Convert the user query to a SQL query. Do not wrap in any markdown tags.",
},
{
role: "user",
content: userQuery,
},
],
});
return result.choices[0].message.content ?? "";
},
{ name: "generate_sql" }
);
const myEvaluator = async (params: {
outputs: { sql: string };
referenceOutputs: { sql: string };
}) => {
const { outputs, referenceOutputs } = params;
const instructions = [
"Return 1 if the ACTUAL and EXPECTED answers are semantically equivalent, ",
"otherwise return 0. Return only 0 or 1 and nothing else.",
].join("\n");
const grade = await tracedClient.chat.completions.create({
model: "gpt-4o-mini",
messages: [
{
role: "system",
content: instructions,
},
{
role: "user",
content: `ACTUAL: ${outputs.sql}\nEXPECTED: ${referenceOutputs?.sql}`,
},
],
});
const score = parseInt(grade.choices[0].message.content ?? "");
return { key: "correctness", score };
};
ls.describe("generate sql demo", () => {
ls.test(
"generates select all",
{
inputs: { userQuery: "Get all users from the customers table" },
referenceOutputs: { sql: "SELECT * FROM customers;" },
},
async ({ inputs, referenceOutputs }) => {
const sql = await generateSql(inputs.userQuery);
ls.logOutputs({ sql });
const wrappedEvaluator = ls.wrapEvaluator(myEvaluator);
// Will automatically log "correctness" as feedback
await wrappedEvaluator({
outputs: { sql },
referenceOutputs,
});
// You can also manually log feedback with `ls.logFeedback()`
ls.logFeedback({
key: "harmfulness",
score: 0.2,
});
}
);
ls.test(
"offtopic input",
{
inputs: { userQuery: "whats up" },
referenceOutputs: { sql: "sorry that is not a valid query" },
},
async ({ inputs, referenceOutputs }) => {
const sql = await generateSql(inputs.userQuery);
ls.logOutputs({ sql });
const wrappedEvaluator = ls.wrapEvaluator(myEvaluator);
// Will automatically log "correctness" as feedback
await wrappedEvaluator({
outputs: { sql },
referenceOutputs,
});
// You can also manually log feedback with `ls.logFeedback()`
ls.logFeedback({
key: "harmfulness",
score: 0.2,
});
}
);
});
```
Note the use of `ls.wrapEvaluator()` around the `myEvaluator` function. This makes it so that the LLM-as-judge call is traced separately from the rest of the test case to avoid clutter, and conveniently creates feedback if the return value from the wrapped function matches `{ key: string; score: number | boolean }`. In this case, instead of showing up in the main test case run, the evaluator trace will instead show up in a trace associated with the `correctness` feedback key.
You can see the evaluator runs in LangSmith by clicking their corresponding feedback chips in the UI.
## Running multiple examples against a test case
You can run the same test case over multiple examples and parameterize your tests using `ls.test.each()`. This is useful when you want to evaluate your app the same way against different inputs:
```typescript theme={null}
import * as ls from "langsmith/vitest";
// import * as ls from "langsmith/jest";
const DATASET = [
{
inputs: { userQuery: "whats up" },
referenceOutputs: { sql: "sorry that is not a valid query" }
},
{
inputs: { userQuery: "what color is the sky?" },
referenceOutputs: { sql: "sorry that is not a valid query" }
},
{
inputs: { userQuery: "how are you today?" },
referenceOutputs: { sql: "sorry that is not a valid query" }
}
];
ls.describe("generate sql demo", () => {
ls.test.each(DATASET)(
"offtopic inputs",
async ({ inputs, referenceOutputs }) => {
...
},
);
});
```
If you have tracking enabled, each example in the local dataset will be synced to the one created in LangSmith.
## Log outputs
Every time we run a test we're syncing it to a dataset example and tracing it as a run. To trace final outputs for the run, you can use `ls.logOutputs()` like this:
```typescript theme={null}
import * as ls from "langsmith/vitest";
// import * as ls from "langsmith/jest";
ls.describe("generate sql demo", () => {
ls.test(
"offtopic input",
{
inputs: { userQuery: "..." },
referenceOutputs: { sql: "..." }
},
async ({ inputs, referenceOutputs }) => {
ls.logOutputs({ sql: "SELECT * FROM users;" })
},
);
});
```
The logged outputs will appear in your reporter summary and in LangSmith.
You can also directly return a value from your test function:
```typescript theme={null}
import * as ls from "langsmith/vitest";
// import * as ls from "langsmith/jest";
ls.describe("generate sql demo", () => {
ls.test(
"offtopic input",
{
inputs: { userQuery: "..." },
referenceOutputs: { sql: "..." }
},
async ({ inputs, referenceOutputs }) => {
return { sql: "SELECT * FROM users;" }
},
);
});
```
However keep in mind if you do this that if your test fails to complete due to a failed assertion or other error, your output will not appear.
## Trace intermediate calls
LangSmith will automatically trace any traceable intermediate calls that happen in the course of test case execution.
## Focusing or skipping tests
You can chain the Vitest/Jest `.skip` and `.only` methods on `ls.test()` and `ls.describe()`:
```typescript theme={null}
import * as ls from "langsmith/vitest";
// import * as ls from "langsmith/jest";
ls.describe("generate sql demo", () => {
ls.test.skip(
"offtopic input",
{
inputs: { userQuery: "..." },
referenceOutputs: { sql: "..." }
},
async ({ inputs, referenceOutputs }) => {
return { sql: "SELECT * FROM users;" }
},
);
ls.test.only(
"other",
{
inputs: { userQuery: "..." },
referenceOutputs: { sql: "..." }
},
async ({ inputs, referenceOutputs }) => {
return { sql: "SELECT * FROM users;" }
},
);
});
```
## Configuring test suites
You can configure test suites with values like metadata or a custom client by passing an extra argument to `ls.describe()` for the full suite or by passing a `config` field into `ls.test()` for individual tests:
```typescript theme={null}
ls.describe("test suite name", () => {
ls.test(
"test name",
{
inputs: { ... },
referenceOutputs: { ... },
// Extra config for the test run
config: { tags: [...], metadata: { ... } }
},
{
name: "test name",
tags: ["tag1", "tag2"],
skip: true,
only: true,
}
);
}, {
testSuiteName: "overridden value",
metadata: { ... },
// Custom client
client: new Client(),
});
```
The test suite will also automatically extract environment variables from `process.env.ENVIRONMENT`, `process.env.NODE_ENV` and `process.env.LANGSMITH_ENVIRONMENT` and set them as metadata on created experiments. You can then filter experiments by metadata in LangSmith's UI.
See [the API refs](https://docs.smith.langchain.com/reference/js/functions/vitest.describe) for a full list of configuration options.
## Dry-run mode
If you want to run the tests without syncing the results to LangSmith, you can set omit your LangSmith tracing environment variables or set `LANGSMITH_TEST_TRACKING=false` in your environment.
The tests will run as normal, but the experiment logs will not be sent to LangSmith.
***
[Edit the source of this page on GitHub.](https://github.com/langchain-ai/docs/edit/main/src/langsmith/vitest-jest.mdx)
[Connect these docs programmatically](/use-these-docs) to Claude, VSCode, and more via MCP for real-time answers.
## Trace feedback
By default LangSmith collects the pass/fail rate under the `pass` feedback key for each test case. You can add additional feedback with either `ls.logFeedback()` or `wrapEvaluator()`. To do so, try the following as your `sql.eval.ts` file (or `sql.eval.js` if you are using Jest without TypeScript):
```typescript theme={null}
import * as ls from "langsmith/vitest";
// import * as ls from "langsmith/jest";
import OpenAI from "openai";
import { traceable } from "langsmith/traceable";
import { wrapOpenAI } from "langsmith/wrappers/openai";
// Add "openai" as a dependency and set OPENAI_API_KEY as an environment variable
const tracedClient = wrapOpenAI(new OpenAI());
const generateSql = traceable(
async (userQuery: string) => {
const result = await tracedClient.chat.completions.create({
model: "gpt-4o-mini",
messages: [
{
role: "system",
content:
"Convert the user query to a SQL query. Do not wrap in any markdown tags.",
},
{
role: "user",
content: userQuery,
},
],
});
return result.choices[0].message.content ?? "";
},
{ name: "generate_sql" }
);
const myEvaluator = async (params: {
outputs: { sql: string };
referenceOutputs: { sql: string };
}) => {
const { outputs, referenceOutputs } = params;
const instructions = [
"Return 1 if the ACTUAL and EXPECTED answers are semantically equivalent, ",
"otherwise return 0. Return only 0 or 1 and nothing else.",
].join("\n");
const grade = await tracedClient.chat.completions.create({
model: "gpt-4o-mini",
messages: [
{
role: "system",
content: instructions,
},
{
role: "user",
content: `ACTUAL: ${outputs.sql}\nEXPECTED: ${referenceOutputs?.sql}`,
},
],
});
const score = parseInt(grade.choices[0].message.content ?? "");
return { key: "correctness", score };
};
ls.describe("generate sql demo", () => {
ls.test(
"generates select all",
{
inputs: { userQuery: "Get all users from the customers table" },
referenceOutputs: { sql: "SELECT * FROM customers;" },
},
async ({ inputs, referenceOutputs }) => {
const sql = await generateSql(inputs.userQuery);
ls.logOutputs({ sql });
const wrappedEvaluator = ls.wrapEvaluator(myEvaluator);
// Will automatically log "correctness" as feedback
await wrappedEvaluator({
outputs: { sql },
referenceOutputs,
});
// You can also manually log feedback with `ls.logFeedback()`
ls.logFeedback({
key: "harmfulness",
score: 0.2,
});
}
);
ls.test(
"offtopic input",
{
inputs: { userQuery: "whats up" },
referenceOutputs: { sql: "sorry that is not a valid query" },
},
async ({ inputs, referenceOutputs }) => {
const sql = await generateSql(inputs.userQuery);
ls.logOutputs({ sql });
const wrappedEvaluator = ls.wrapEvaluator(myEvaluator);
// Will automatically log "correctness" as feedback
await wrappedEvaluator({
outputs: { sql },
referenceOutputs,
});
// You can also manually log feedback with `ls.logFeedback()`
ls.logFeedback({
key: "harmfulness",
score: 0.2,
});
}
);
});
```
Note the use of `ls.wrapEvaluator()` around the `myEvaluator` function. This makes it so that the LLM-as-judge call is traced separately from the rest of the test case to avoid clutter, and conveniently creates feedback if the return value from the wrapped function matches `{ key: string; score: number | boolean }`. In this case, instead of showing up in the main test case run, the evaluator trace will instead show up in a trace associated with the `correctness` feedback key.
You can see the evaluator runs in LangSmith by clicking their corresponding feedback chips in the UI.
## Running multiple examples against a test case
You can run the same test case over multiple examples and parameterize your tests using `ls.test.each()`. This is useful when you want to evaluate your app the same way against different inputs:
```typescript theme={null}
import * as ls from "langsmith/vitest";
// import * as ls from "langsmith/jest";
const DATASET = [
{
inputs: { userQuery: "whats up" },
referenceOutputs: { sql: "sorry that is not a valid query" }
},
{
inputs: { userQuery: "what color is the sky?" },
referenceOutputs: { sql: "sorry that is not a valid query" }
},
{
inputs: { userQuery: "how are you today?" },
referenceOutputs: { sql: "sorry that is not a valid query" }
}
];
ls.describe("generate sql demo", () => {
ls.test.each(DATASET)(
"offtopic inputs",
async ({ inputs, referenceOutputs }) => {
...
},
);
});
```
If you have tracking enabled, each example in the local dataset will be synced to the one created in LangSmith.
## Log outputs
Every time we run a test we're syncing it to a dataset example and tracing it as a run. To trace final outputs for the run, you can use `ls.logOutputs()` like this:
```typescript theme={null}
import * as ls from "langsmith/vitest";
// import * as ls from "langsmith/jest";
ls.describe("generate sql demo", () => {
ls.test(
"offtopic input",
{
inputs: { userQuery: "..." },
referenceOutputs: { sql: "..." }
},
async ({ inputs, referenceOutputs }) => {
ls.logOutputs({ sql: "SELECT * FROM users;" })
},
);
});
```
The logged outputs will appear in your reporter summary and in LangSmith.
You can also directly return a value from your test function:
```typescript theme={null}
import * as ls from "langsmith/vitest";
// import * as ls from "langsmith/jest";
ls.describe("generate sql demo", () => {
ls.test(
"offtopic input",
{
inputs: { userQuery: "..." },
referenceOutputs: { sql: "..." }
},
async ({ inputs, referenceOutputs }) => {
return { sql: "SELECT * FROM users;" }
},
);
});
```
However keep in mind if you do this that if your test fails to complete due to a failed assertion or other error, your output will not appear.
## Trace intermediate calls
LangSmith will automatically trace any traceable intermediate calls that happen in the course of test case execution.
## Focusing or skipping tests
You can chain the Vitest/Jest `.skip` and `.only` methods on `ls.test()` and `ls.describe()`:
```typescript theme={null}
import * as ls from "langsmith/vitest";
// import * as ls from "langsmith/jest";
ls.describe("generate sql demo", () => {
ls.test.skip(
"offtopic input",
{
inputs: { userQuery: "..." },
referenceOutputs: { sql: "..." }
},
async ({ inputs, referenceOutputs }) => {
return { sql: "SELECT * FROM users;" }
},
);
ls.test.only(
"other",
{
inputs: { userQuery: "..." },
referenceOutputs: { sql: "..." }
},
async ({ inputs, referenceOutputs }) => {
return { sql: "SELECT * FROM users;" }
},
);
});
```
## Configuring test suites
You can configure test suites with values like metadata or a custom client by passing an extra argument to `ls.describe()` for the full suite or by passing a `config` field into `ls.test()` for individual tests:
```typescript theme={null}
ls.describe("test suite name", () => {
ls.test(
"test name",
{
inputs: { ... },
referenceOutputs: { ... },
// Extra config for the test run
config: { tags: [...], metadata: { ... } }
},
{
name: "test name",
tags: ["tag1", "tag2"],
skip: true,
only: true,
}
);
}, {
testSuiteName: "overridden value",
metadata: { ... },
// Custom client
client: new Client(),
});
```
The test suite will also automatically extract environment variables from `process.env.ENVIRONMENT`, `process.env.NODE_ENV` and `process.env.LANGSMITH_ENVIRONMENT` and set them as metadata on created experiments. You can then filter experiments by metadata in LangSmith's UI.
See [the API refs](https://docs.smith.langchain.com/reference/js/functions/vitest.describe) for a full list of configuration options.
## Dry-run mode
If you want to run the tests without syncing the results to LangSmith, you can set omit your LangSmith tracing environment variables or set `LANGSMITH_TEST_TRACKING=false` in your environment.
The tests will run as normal, but the experiment logs will not be sent to LangSmith.
***
[Edit the source of this page on GitHub.](https://github.com/langchain-ai/docs/edit/main/src/langsmith/vitest-jest.mdx)
[Connect these docs programmatically](/use-these-docs) to Claude, VSCode, and more via MCP for real-time answers.